Free Trial Offer

Wednesday, February 26, 2014

Digital Makeup : Adobe Photoshop Tutorial


In this video playlist, you will find about 19 video tutorials on digital makeup. Watch and learn digital makeup using adobe Photoshop.
Digital Makeup

Monday, January 20, 2014

Wedding Photography: Capture The Heart Of the Moment

A camera can arrest the absolute world. It captures the apple as we see it and as well the apple above it. I feel photography as a painting with colors and light. Weddings are a lot of admirable affairs on apple and marriage photography is the photography to advertise the activities during weddings (Pre and Post wedding).
Weddings are an admirable activity and the alone candied memories that abide with us for the blow of our lives. The marriage pictures should appear out as amazing as the marriage happens. Marriage photography has altered shades, as weddings are consistently bright and abounding with emotions. Weddings are not about affections and sentiments, a lot of fun and antic play an important role in abrasion the canvas.
According to history, the abstraction of marriage photography came into actuality afterwards the Second Apple War. Earlier, photography was a beefy assignment area they about acclimated films, negatives and after came the analog cameras and now we see able photographers application agenda SLR's.
Analog cameras provided alone low superior photographs but with SLR's we accept top superior pictures and can as well dispense ambient ablaze which is consistently a claiming for a photographer.
We accept altered approaches to marriage photography, but mostly we see Traditional, Photojournalistic and Contemporary marriage photography.
Traditional photography as the name suggests provides commonly fairish pictures taken on the Big Day and Photojournalistic photography comes from alteration and abacus up added abstruse options to the marriage pictures. We accept abounding software options for photography alteration and acceptable the pictures. Mostly, we see photographers aggregate these styles. Contemporary/fashion-based Photography is complete poles afar to acceptable photography area the columnist takes the ambient and the artifice from the day. Contemporary photographers are professionals who accommodate calm and alfresco photography and as well photojournalistic appearance appropriate to enhance the photographs.
The marriage photography bazaar is alternate and affable abounding styles, account and experts. With the latest technology now in hand, humans about get into marriage photography after above-mentioned experience. It is important that one has a lot of backbone and absorption as it is back-breaking plan and one has to be alert throughout the commemoration for continued hours and one should be able to adumbrate and abduction emotions. Humans ambitious to become marriage photographers can get able training from accounted institutes. There is consistently an acceptable appeal for marriage Photographers and appropriately what is important is to advance aberrant superior in work.
Glamor Retouching is widely used in Wedding photography.

Thursday, January 16, 2014

Edit Your Photos With Adobe Photoshop - Simple Ways to Make Them Look Professional

Do you adulation photography so abundant but you just can't assume to aftermath abundant searching photos? Do you wish your abecedarian searching photos to attending like it was taken by able photographers?
Glamour Retouching

If you answered yes to any of these questions, again you will charge the Adobe Photoshop.

First of all, you charge to bethink that a lot of able photographers today use Adobe Photoshop to adapt the agenda photos they take. You charge to bethink that not every photo they yield is absolute and some will accept the accepted mistakes in photography, such as the booze phenomenon, feel over the lens affection and even the duke agitate syndrome.

Poor acknowledgment is addition adversary of photographers.

Whatever it is, able photographers are able to fix these mistakes by just application Adobe Photoshop. In fact, some able photographers even adapt the photos they yield of models with Adobe Photoshop. If you apprehend magazines, and you noticed the near-perfect bodies of models and actual bland skin, again you accept an abstraction on how able photographers dispense the photos they yield with Adobe Photoshop. For example, if you yield pictures of anyone who has an animal searching zit on their face, again you will be able to accomplish their face attending absolute by removing the zit or abscess with Adobe Photoshop. In fact, you can even use Adobe Photoshop to accomplish anyone fat attending like a supermodel.

Here are some of the basal means on how you can accomplish the photos you yield attending added professional.
The aboriginal is by eliminating the red eye from the photos. You charge to bethink that even if you are application the latest SLR agenda camera with red eye reduction, it will still happen. Adobe Photoshop has red eye apparatus that will analyze and absolutely abolish the actualization of the red eye from the photos you take. It will even abolish the red eyes from your pet cat or dog.

Secondly, you will be able to actualize brighter and clearer photos with added active colors. Adobe Photoshop is meant to be an apparatus to advice apple-pie up an angel as able-bodied as advance its appearance. With the blush acceptable accoutrement and acclimatize accuracy and adverse tools, you will be able to about-face aphetic photos in to something that looks like it was taken in absolute lighting condition. Basically, the apparatus will acquiesce you to manually acclimatize the image's blush settings that will aftereffect in the sharpest and cleanest actualization of the angel as possible.

Another abundant alteration affection of Adobe Photoshop is that it will even acquiesce you to abolish exceptionable altar in the photos you already took. For example, if an acutely absolute photo was just broke by a debris can on the background ( background remove ), you can calmly abolish the debris can and alter it with something abroad as if the debris cans wasn't even there at all if you took the picture. You can even crop out humans from the photos you yield and even alter the background using clipping path.

These are just some of the abundant things that you can do with Adobe Photoshop. As you can see, even an abecedarian columnist like you will be able to yield able searching pictures. With the advice of Adobe Photoshop, you will be able to accomplish your photos attending as if it was taken by an able photographer.

Get this charge less address and ascertain our absolutely different step-by-step video training system, advised to accomplish any newbie user absolutely competent with the basics of any Adobe Photoshop Software in almanac time.

Monday, October 21, 2013

The BEST Technic to Create a Photoshop clipping path: By Hand!

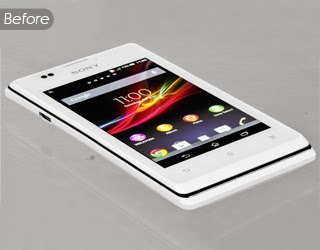
When it comes to producing high quality Photoshop clipping paths, the reality is there's no fast and easy thanks to accomplish a decent cutout - you only ought to get it on properly... by hand. once creating clipping paths, the a lot of you utilize the Pen Tool in Photoshop, the quicker and a lot of proficient you'll become.

If you click and hold the Pen Tool within the Photoshop Tools Palette you'll see an inventory of all its subsidiary tools. the sole ones you'll use square measure the Pen Tool, +Add Anchor purpose Tool, -Delete Anchor purpose Tool and Convert purpose Tool. And you won't ought to select them perpetually from the Tool bar - you'll flick between them by exploitation the control key and angular position Key on a waterproof. it\'s going to become wont if you persist.

Experiment with the fantastic Convert purpose Tool (and others) by pressing the angular position key Associate in Nursing clicking on an existing anchor purpose. you'll quickly pick up how the tools work.

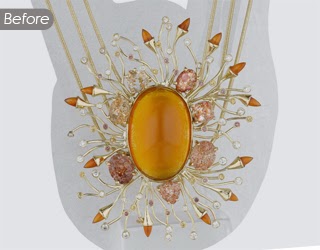
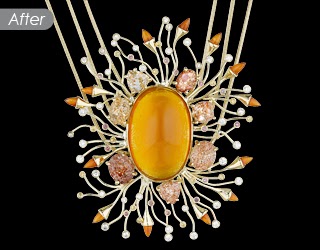
As you'll see below, you should trace the image so the path is roughly within the center of the anti-aliasing. Anti-aliasing happens once the computer blends the laborious edges of a picture object by exploitation a median of the item color and background color in order to soften the difference between the foreground and background objects.

In other words, place the path 0.5 way between the brown and therefore the blue!

The right Tricks to produce Photoshop Clipping path.

This minimizes the number of blue 'ghosting' that may appear around the perimeters of the ultimate image cutout. Once you have got copied all the way around the image, select Save Path... from the paths cascading menu (as explained above), so select Clipping Path... you will be asked for a 'Flatness' worth. Leave this blank. make certain the image is 300DPI actual size and CMYK. reserve it as a Photoshop EPS file with normal terms, and place it in In-design. Select High Quality show so as to induce the simplest on-screen redraw, and you'll see that the result's rather more accurate with abundant less ghosting, and it has a swish, accurate edge.


Perfect Photoshop Clipping paths

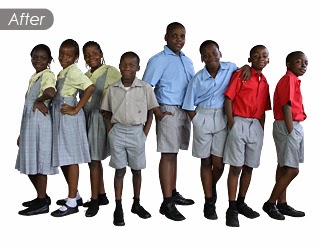
You may still get a 'haze' around a picture, which the path has transmitted from the previous background. this is wherever Photoshop clipping paths square measure limited. because they are rigid, hard-edged vector shapes, they take no account of the actual fact that the item in question may be a little out of focus, requiring a softer edge.

A softer, or 'feathered' edge to your cutout are often achieved within the following way.

Photoshop Clipping path Service

Our clipping path service is one among the foremost in style that we provide, however what precisely will it entail?

Simply put, a clipping path is a top level view created around a picture which permits you to get rid of an image from its background – very like cutting a picture out of a magazine with scissors.

You may additionally hear a clipping path observed as a ‘closed vector path’ or ‘shape’. Once the clipping path is processed, everything on the line, or ‘path’, is enclosed in the film and everything outside is left behind. Something you don’t wish to look in the finished image – whether it’s a background or another unwanted part sort of a shadow or display stand – may be removed.

Using image written material code like the trade customary Adobe Photoshop, our sure-handed operatives use the extremely precise pen tool to outline areas of a picture for manipulation. At a basic level, this can be tracing the define of an image so that it may be utilized in a layout programme like Quark categorical or InDesign. However, we will additionally use the clipping path to alter the form of a picture, edit a particular region, or produce a collage of many pictures for a layout design.

Although there square measure different ways for removing unwanted parts from a picture, there are no techniques which will rival the standard achieved by image processing services using a clipping path elect manually by a skilled operative. If you’re yearning for a service which will provide you with a sharp, defined edge appropriate for commercial enterprise, Clipping Path Republic of India has a name for delivering each and each time.


We pride ourselves on the standard of the finished product – regardless of what number pictures you would like written material. The accuracy of exploitation the pen tool far exceeds what may be achieved via the automated functions of some ikon written material packages. Tools like Photoshop’s Magic Wand will solely produce outlines which square measure either general (with elements of the background still visible), or exceptionally ragged (with a grip that looks pixellated and very unprofessional). Our trained operatives have years of expertise and create clipping ways that square measure smooth and correct – whether it’s a single path for basic written material, or multiple ways for color correction.


Our services square measure ideal for anyone – from commercial enterprise professionals wanting to submit thousands of pictures, to people WHO solely need work done on a number of. the cost for clipping path services depends on the quantity of images, the specified turnaround time and therefore the level of quality. However, by exploitation associate degree outsourcing company like Clipping Path, you\'ll be able to take pleasure in DTP professionals with Brobdingnagian expertise for under a fraction of the value you'd pay in Europe or America. Our costs start from as very little as $0.49 USD per picture. we provide quotations at intervals one hour, so you won’t be left waiting with a project that you simply wish completed.

Image masking : The art of Modern Glamour Photography


Creating a clipping mask around objects that have blurred or fuzzy edges will typically produce results that square measure but excellent. Our aim at USA is to confirm that each image you send U.S. is finished to the foremost exacting standards. As such, we offer a Photoshop masking service for photos that aren't appropriate for a regular clipping path – delivering nice results to purchasers World Health Organization expect nothing less. Our extremely trained graphic designers use the newest Photoshop masking techniques to get rid of backgrounds from pictures like hair or the foliage on trees, leading to sharp and swish edges that look systematically skilled. notwithstanding the image you want to use is ready against the foremost careful background of dark or gradient colors, we will separate it from the foreground image while maintaining prime quality and an incredible level of detail.

Irrespective of the extent of define complexness, our mean graphics operatives will surmount all issues to deliver a superlative result. we tend to pride ourselves on adapting our approach to the task in hand, instead of continued to use generic techniques to a photograph despite what it's. every of our mean operatives encompasses a specific space of experience and continues to make on it skills base to confirm they're a master of their craft. As such, you'll rest assured that your image masking desires are tackled by a consummate skilled with grade of expertise one at intervals the offshore graphic studio sector.

Working closely with our purchasers, we try to confirm that the top result's the simplest potential picture for the context within which it'll be used. Manually masking pictures may be a mean, careful and labour intensive method – however is actually well worth the effort it needs. Now, firms will communicate wit us as effortlessly like that they had their own in house style studio right in their offices. We've been delivering
over-sewn image masking services for several years and perceive the complexities concerned. Moreover, we tend to realize that a series is barely as robust as its weakest link then even the tiniest error created while applying a Photoshop masking technique can ruin the whole impact. The work of every mean operative is vetted via a rigorous internal control method to confirm that we tend to apprehend right time.

Sunday, October 13, 2013

Background Removing from your photos

Sometimes you'll notice that you simply have to be compelled to produce a completely black (or whichever color you prefer) background to reinforce and isolate your main subject within the image. this can be particularly helpful if you're attending to sell merchandise on Ebay or are functioning on making a catalog of your merchandise. This tutorial can show you the way to use the short Mask in Photoshop for background remove from your photos.

We kick this tutorial off with this image of a flower with a awfully distracting building within the background. It doesn't look superb.

 Step 1:

Duplicate the layer and make a black background layer.
Open the image in Photoshop. Duplicate the layer containing your image. Layer > Duplicate Layer. this may be the layer we'll be operating with presently. you furthermore may got to produce a background layer crammed with the colour of your alternative (in this tutorial we'll be mistreatment black). head to Layer >> New >> Layer and fill the layer with black mistreatment the Paint Bucket Tool. check that to position the black layer below the duplicate layer of your original image. you are doing this by dragging and dropping it within the desired position on the layer tab.

Step 2:

There area unit varied ways that of going regarding this, you\'ll be able to sit all day and erase the background manually or fiddle with channels. I like better to use the fast Mask choice. fast Mask permits you to form a range (mask) by painting with black over the areas you would like to incorporate in your selection. Painting with white removes the world from your choice. The areas you've got painted over are going to be visible as a red overlay. Sounds difficult, however it’s truly quite straightforward.
With the duplicate layer of your image set because the active layer, activate fast Mask mode by clicking on the fast Mask icon, or by pressing “Q” on your keyboard.

Step 3:

Painting in black marks the areas for choice.
Now we are able to begin painting. betting on the image you may got to choose the suitable brush size and kind. I like better to use an outsized solid brush for the massive areas and a smaller soft brush for the elaborated areas. we'll be painting with black over the areas of the image we wish to stay visible. You don’t got to be terribly precise at this stage.

Step 4:

Zoom in and work on the elaborated sections of the image.
With the biggest components painted over we are able to begin on the a lot of elaborated areas. Here it’s terribly useful to concentrate and build use of a smaller brush size. wherever you\'ve got overlapped the sides of your subject you'll be able to paint mistreatment white to get rid of the unwanted areas from the choice. If you've got incomprehensible  a spot or 2 you'll be able to paint mistreatment black to feature it to the choice. If you create miscalculation you'll be able to perpetually undo it.
For the simplest results you ought to pay quite a quantity of your time refinement your mask to be as correct as doable. The a lot of effort you set into it currently, the higher your result are going to be.

Step 5:

The red overlay created by the fast mask choice.
Once you've got completed painting over all the areas you would like to stay visible your image ought to look one thing just like the on top of. Note the red overlay that shows the world that you simply have painted over.
Now it's time to check however we have a tendency toll we coloured at intervals the lines. Press Q on the keyboard to go away fast Mask mode and enter normal Mode. The spaces you would like to stay ought to currently be offered as a variety (the area contained at intervals the dotted lines).

Step 6:

The selection before the unwanted area unitas are deleted.
Press “Delete” on the keyboard. The unwanted areas can currently be deleted and also the black layer we have a tendency to created earlier are going to be visible in their place. (If you aren’t pleased with the result you'll be able to use “Undo” and “Step backward” till you come back to to your mask. Refine the mask till you're pleased with it and repeat step five and 6).
You can conjointly enhance any spots you may have incomprehensible  by painting over them with the specified color. That’s it! You’re done. once done right the tip result ought to look one thing like this: